
V1DA 2014D was developed in many different languages. For a while now, we have always been able to add them, but we did so case by case. But now, we are excited to share that all of our V1DA systems will be installed with all 17 languages, along with a desktop folder of quick shortcuts to swap in seconds.
Languages included: German, English (US & UK), Spanish, Finnish, French, Italian, Japanese, Korean, Dutch, Portuguese, Russian, Swedish, Thai, Turkish, Mandarin Chinese and Taiwanese.
For past customers looking to add this to their system, see instructions below.
So lets begin with some overview info…
To switch between two (or more) languages you need to change the language preferred by the user that logins to V1DA 2014D.
These users are admin, 1, 2, 3 or 4 depending on your car’s original market. (See V1DA instructions.)
All users get the language set by a process at the end of an install.
To change the language you need to use OSQL.EXE to change the “AccessServer” database setting “Users””fkLanguage”. (You won’t actually be using it, the computer will be, and I will walk you through it below.)
Thank you to Matt for creating or sorting through most of this, including the example files included. These are batch files, that when run, will change between English (US), Swedish, Spanish, French and Portuguese in this example package. More on that soon.
HOW TO SETUP MULTIPLE LANGUAGES ON YOUR VIDA SYSTEM:
STEP 1: Get some basic files you’ll need to set the V1DA language. Available on this website’s downloads page, but also here.
You’re looking for “set_fkLanguage_v2.7z” and you want to unzip this to your current V1DA install location… usually “C:\VIDA\”, and put it there in a new folder… so it will look like:
C:\VIDA\set_fkLanguage
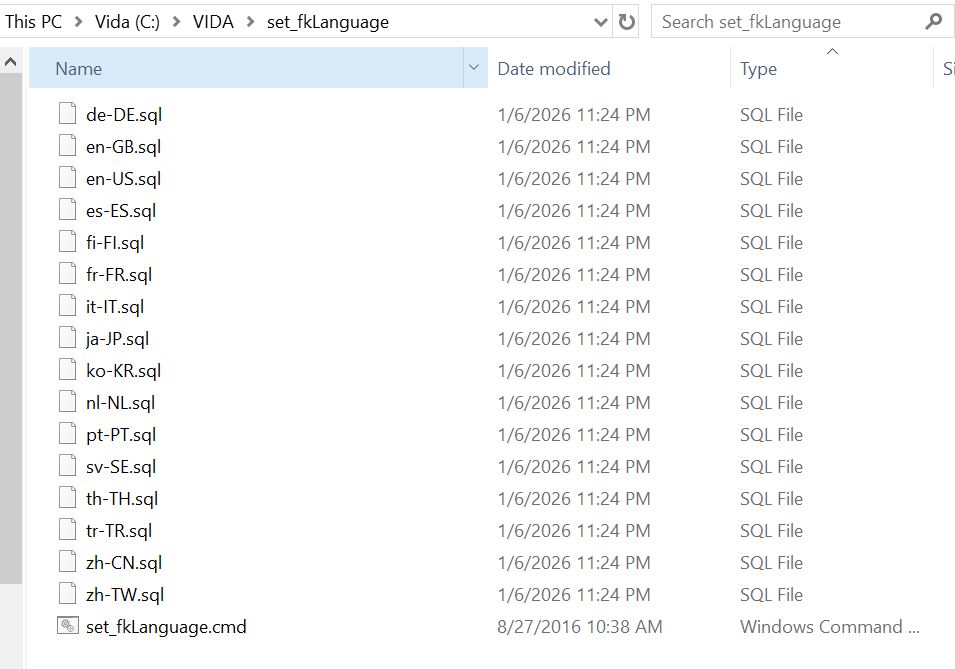
Now, in that folder, you’ll have the set_fkLanguage.cmd command file you need, along with a bunch of SQL’s, and quick-change shortcuts.
(Note: If anything is added to the “set_fkLanguage” folder name, like “(1)” or “_2” or something, it won’t work. It must match “C:\VIDA\set_fkLanguage”).
(Another note: It is extremely important that this folder has inside of it the “set_fkLanguage.cmd” command file, and the SQL files for your selected languages – more on this later, even a picture.)
STEP 2: After this folder is setup in your V1DA installed location (“C:\VIDA\set_fkLanguage”) move the shortcut icons (VIDA en-US, VIDA sv-SE, VIDA es-ES, VIDA fr-FR, VIDA pt-PT, etc) that correspond to the languages that you would like to use, to a preferred location of your choice, such as the desktop. We will expand upon this later.
(Note: These icons ONLY perform the language switching. They do not launch V1DA itself.)
STEP 3: Now download the language packs you’d like to install, they are located here. (Yes, you can do all of them. It will add about 10gb to your V1DA install size, and installing 17 versions of V1DA languages will take close to 2 hours to perform, but it will do it, no problem. Or you could just select those 5 languages from the example pack – English (US), French, Portuguese, Spanish, Swedish.)
Languages available:
- de-DE = German (Deutsche)
- en-GB = English (UK)
- en-US = English (US)
- es-ES = Spanish (Español)
- fi-FI = Finnish
- fr-FR = French
- it-IT = Italian
- ja-JP = Japanese
- ko-KR = Korean
- nl-NL = Dutch (Netherlands)
- pt-PT = Portuguese
- ru-RU = Russian
- sv-SE = Swedish
- th-TH = Thai
- tr-TR = Turkish
- zh-CN = Mandarin Chinese
- zh-TW = Taiwanese
STEP 4: You will now need to modify the files you used to install V1DA 2014D in the first place.
(Note: you’re now shifting from the installed files, to the files used for installing.)
For those using my system/files, find the V1DA DVD install files at “C:\VIDA Resources\VidaDVD\” – or “C:\INSTALL FILES\” on an older system of mine.
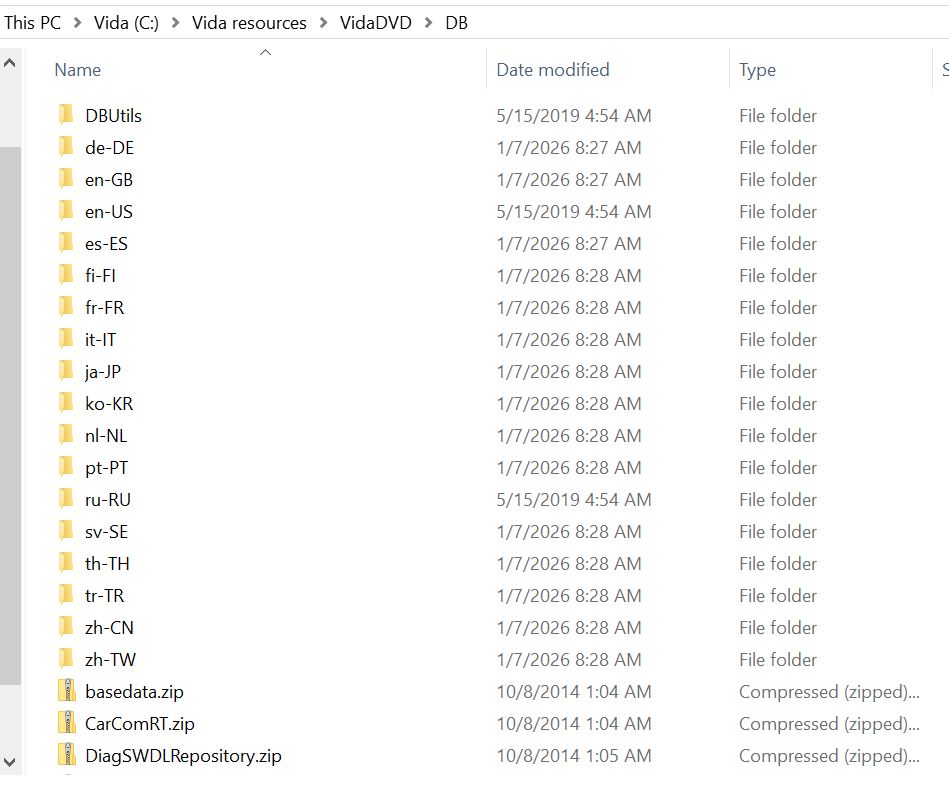
For others, here is how that is usually done: Extract the DVD iso with winrar or winzip, if you haven’t already, then go and look into the extracted files. You will see a folder called “DB”, (not “DBUtils”), usually at the top level, it’s not too buried. This is where you have to add the language packs you want to add so that the installer can find it and give it to you as a language option when you run the V1DA installer (which is Step 8.)
STEP 5: Inside the “C:\VIDA Resources\VidaDVD\DB” folder you should see some language packs already there. For instance the “en-US” folder is for English (US), “ru-RU” is for Russian, and so on. Here, you create a folder for EACH new language you are adding. FOR EXAMPLE: Adding Mandarin Chinese, you’ll create one and name it “zh-CN” (see pic below.) What you name it, is based on what name the SQL and Language Pack zip file itself uses (see Note below – or maybe you noticed it already.)
(Note: you are getting the naming convention for these language folders, from the Language Pack zip files you downloaded in Step 4. It is important that these folders follow that naming style, ie. “pt-PT”, “en-GB”, “zh-TW”, and so on (see pic below), as that is what V1DA will be looking for when installing.)
STEP 6: Move the Language Pack zip file(s) that you downloaded (WITHOUT UNZIPPING) into the folder(s) you just created. FOR EXAMPLE: The Italian “it-IT” folder should have a “servicerep_it_IT” zipped file inside of it. Leave it just like that.
(Note: the original “en-US” folder will show you how this should look, but for the English (US) side of it. Follow that as a template, essentially.)
In the install DVD files “DB” folder, it should look like this, with each language folder having a still-zipped “servicerep” file for the corresponding language inside of it:
STEP 7: Go to the taskbar, near the clock, and right-click the V1DA monitor icon (the V icon that usually goes red, to yellow, to green as it readies itself), and choose EXIT. (Stop works too, but why not just exit? Seems to work either way.)
STEP 8: Re-install V1DA. (Again, make sure V1DA monitor is stopped/off, in the taskbar, if not, right-click and exit it.)
Run your V1DA installer over-top of your existing installation (no need to remove anything). For those using my system/files, go to “C:\VIDA Resources\VidaDVD\” (or “C:\INSTALL FILES\”) and then right-click the “02_VIDA.cmd” file and choose run as administrator.
Remember to have patience throughout this install process. Sometimes it might look like it’s stuck, but it’s not. Let it sit and 99% of the time it will be fine.
Choose the top “V1DA All-In-One” option when it asks what you want to install.
Then when it asks which languages you’d like to install, choose all the languages you’d like (I always re-pick the languages I have installed again at this point, just to be safe.) Check the boxes you want. You should see all the language options that you setup, as they correlate to the folders that you created and language pack zips that you saved into the DVD install files.
When asked, choose “Restart the computer later”. (If you do end up restarting now, that’s ok, you’ll have to run the patch (Step 9) when it’s booted up again, and then restart a second time. Always restart after the patch is run.)
Note: There may be 3 extra V1DA icons added to the desktop now, in addition to “V1DA All-In-One” – you can delete those 3. They are unused. You may also delete the old “V1DA 2014D All-In-One” icon that might still be there, if there is one.
STEP 9: Once V1DA is finished installing and you’re back to the desktop, don’t open it yet, as you need to run the final V1DA install patch. (If you did open V1DA, close it, then use the patch below, reboot, and we’ll pretend that didn’t happen.)
Get the V1DA install patch, unzip it and run it as administrator: V1DA 2014D Patch (Download to desktop, unzip, right-click the patch file and run as administrator, don’t change the install path from C:\ – you can later delete this patch file from the desktop.) Run the patch, watch the popups and ignore any script you might read about missing this or error that. Don’t worry, it’s working. Let it flash some boxes and then once its all stopped…. reboot.
(For those using my system/files, the patch is on your computer and stored at “C:\VIDA Resources\VOLVO VIDA 2014D Patch 213064bitv2” – don’t forget to right click and run as administrator.)
After you have now rebooted your computer, let V1DA ready itself before you open it (green arrow on the V icon near the taskbar clock.) To change a language for one of the 5 in the example pack, if that’s what you’re doing to get started, jump to Step 11.
STEP 10: Move the SQL’s to inside “C:\VIDA\set_fkLanguage” folder.
Note: If you added languages that aren’t in the files package provided, you need to add the SQL’s for those in the folder you made in Step 1. You need to copy one of the existing *.sql files inside “C:\VIDA\set_fkLanguage”, rename it, FOR EXAMPLE: copy the “en-US.sql”, rename it “de-DE.sql”, double-click and open the new file using the basic word editor program, edit the line so it looks like this, and then save it:
LanguageCode=’de-DE’
(Alternatively, you can use all the premade and modified SQL’s that were included in the file package. Unzip and save them in the “C:\VIDA\set_fkLanguage” folder and you won’t have to edit anything.)
It should look like this:
STEP 11: Now you can quickly switch the language V1DA uses by utilizing the batch files you copied to the desktop in Step 2 (or create & customize your own; instructions below).
For example, for Swedish: double-click the shortcut “VIDA sv-SE”. Some boxes will flash on the screen, and then nothing else will happen. But if you login to V1DA 2014D, you’ll see the language has changed (note: you’ll see it after the 1, 2, 3, 4 login.)
Close V1DA 2014D before changing languages again.
To go back to English (US): double-click the shortcut “VIDA en-US”. Login again to V1DA 2014D, and the language will be changed.
(Note: You can see which language V1DA has loaded, after login, at the top left of the browser, it’ll show the SQL name ie, “en-US” in the text line, for whichever you are using.)
(Also: Feel free to also rename the shortcut, such as change “VIDA sv-SE” to something like “Switch to Swedish”, if its helpful to be clearer.)
To create your own:
To switch languages, you have to tell V1DA to load the language pack you want. For this example; it can be done from a command prompt (windows start menu, type in “command”, right-click to run as admin), type in:
set_fkLanguage.cmd de-DE
Then press enter. Some black boxes will flash and it will have changed the V1DA 2014D language to German (if installed).
But no one wants to use command prompt all the time, so these shortcuts are designed to make it easy and quick:
Copy one of the desktop shortcuts provided in the example package, (the ones you moved from the set_fkLanguage folder in Step 1 to the desktop, like the one entitled “VIDA en-US” for example.)
Paste that copy onto the desktop.
Right-click on what you copied, and go to properties. In the Target line you’ll see that same command prompt (set_fkLanguage.cmd en-US); change “en-US” at the end of the script there, to “de-DE”, without the quotes to make it a shortcut for German. Save. Then rename it something like “Switch to German” – now you have a shortcut to change to German quickly.
(Alternatively, you can use all the premade shortcuts included in the file package. If you followed these instructions, then unzipping this folder and saving to your desktop will work great. It’s helpful to realize, these commands match up with the SQL files in “C:\VIDA\set_fkLanguage”).
FINALLY: Before using V1DA, always wait for the V icon to turn green (taskbar by the clock), then double-click it (or use the icon on the desktop) to open V1DA 2014D and login as normal.
—
PROBLEMS?
It’s likely Step 10, make sure you have the SQL files built for your chosen languages in the “C:\VIDA\set_fkLanguage” folder. You can also download mine and just drop them all into your “C:\VIDA\set_fkLanguage” folder.
Problem with the switch shortcuts? Check the properties of the language shortcut, in the target line, and make sure it’s directing to the correct SQL file for the language (Step 11).
V1DA 2014D won’t let you login? Getting a helpdesk message? Run the V1DA install patch again (Step 9) and reboot.
More problems? Are you sure you installed the chosen language into V1DA? (Step 8). Remember, you have to drop the language files into your DVD install files pack. Not the files installed on the C:\ drive. You are however adding the set_fkLanguage command file and SQL’s into the installed V1DA files on the C:\ drive (Step 1). It is imperative that it have that command file to operate. Make sure all the pieces are in the right places.
—
GOOD LUCK! AND ENJOY!